Turn a Jotform submission into a personalised onboarding plan with AI
Capture new-hire details in Jotform, have an AI agent work out priority level and a personalised onboarding plan, then send the right emails — including an executive fast-track — and log everything to Google Sheets.
What this looks like
One step on screen at a time. Read it, do it, tap Next.
Turn a Jotform submission into a personalised onboarding plan with AI
Step 1 of 15
Capture the submission with Jotform Trigger
Add a Jotform Trigger node connected to your intake form. Every submission fires the workflow with the raw form fields as the payload.
Checkpoint
A test submission on the form produces an item with all your Jotform field names.
Before you begin
Tick these off as you sort them. Stopping halfway to create an account is how a fifteen-minute build becomes an hour.
0 of 9 ready
Ticks are saved on this device, so you can come back to them.
- Account
The form should collect Employee Name, Employee Email, Position, Department, Start Date, Manager Email, Laptop Type, Experience Level, Address, Shirt Size, Employee Type, Software Access, Phone Needed, Emergency Contact and Dietary Restrictions.
Jotform - Credential
Needed for the Jotform Trigger node to receive submissions from your specific form.
- API key
Powers the AI Agent that reads each new hire's role and experience level and produces a structured onboarding plan.
OpenAI API keys - Account
Sends four different emails: the welcome email, the manager notification, the IT setup request, and — for executive hires — an HR alert.
- Have ready
Logs every submission with its full form data and the employee's assigned ID. Column headers should match the Jotform field names plus id, Employee Name and Employee Email.
- Time
The AI Agent's prompt and the Code node that parses its response are the fiddliest parts to get right — budget extra time for testing edge cases.
The basics — ticked once, remembered everywhere
- Account
Either the hosted version or a self-hosted install. Everything here works the same on both — the only visible difference is the shape of your webhook URLs.
Create a workspace - Know-how
Adding a node, connecting two of them, and pressing Execute. If any of that is new, the free primer covers it in about ten minutes.
- Credential
You will paste at least one secret during setup. A password manager beats a notes app, and it stops you pasting a live key into a chat window by accident.
The shape of the workflow
The nodes you will end up with, left to right, in the order you add them.
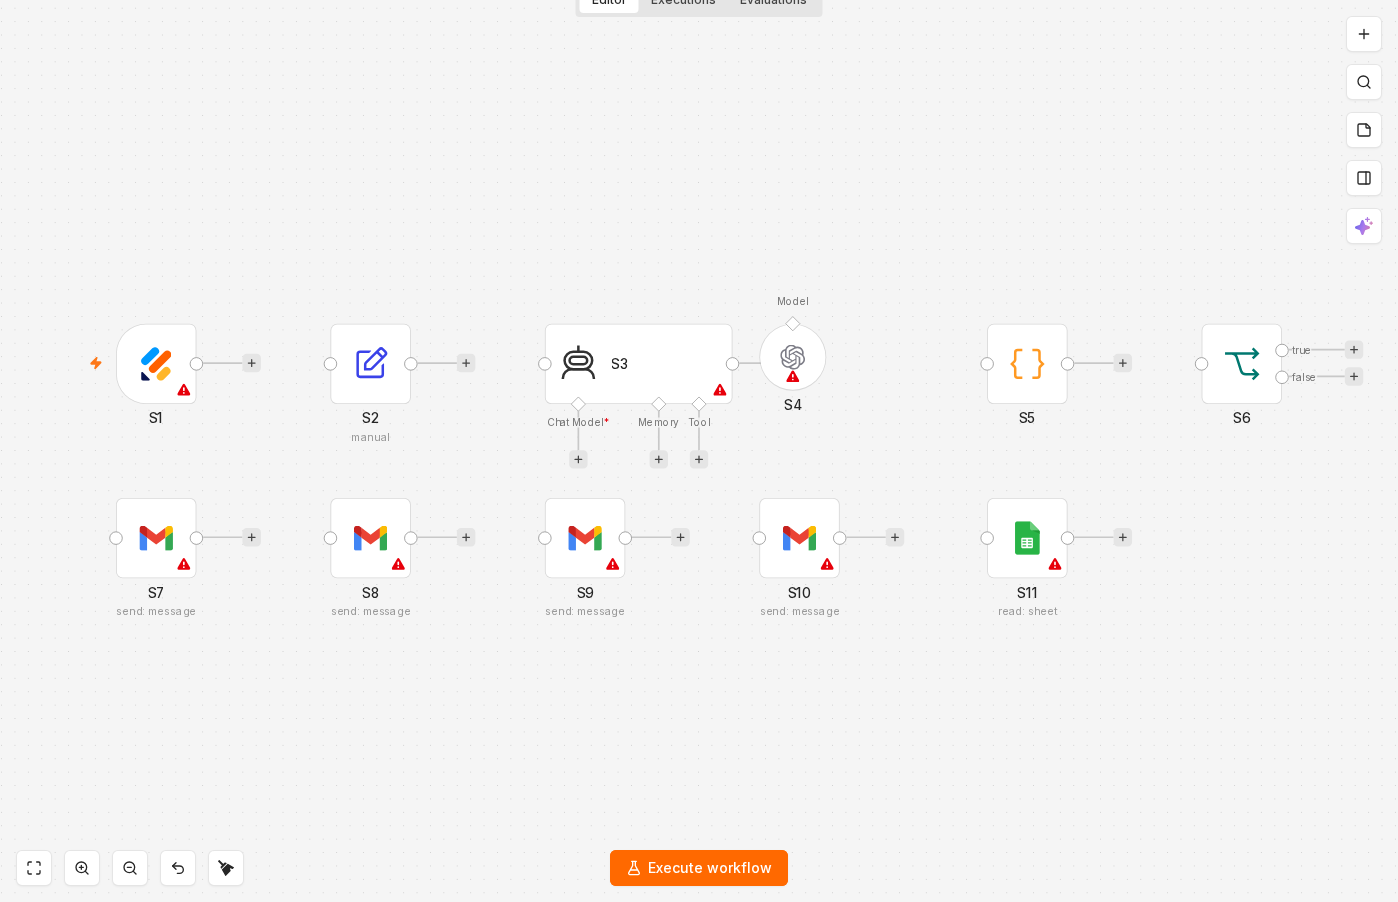 4 things to set here
- 1Jotform Trigger — the trigger — everything starts here
- 2Edit Fields (Set) — Extract and normalise the core fields
- 3AI Agent — Profile the role with the AI Agent
- 4OpenAI Chat Model — Connect the OpenAI Chat Model
Skip the node hunting
Import a starter file with every node for this build already on the canvas, named after its step and wired in order, each one carrying a sticky note with the values to enter. You still connect your own accounts and fill the fields — that is what the walkthrough takes you through — but you never start at a blank canvas.
In n8n: Workflows → Import from file.
What you will build
Jump straight to any step, or print the list and tick it off beside your n8n tab.
- 1Capture the submission with Jotform Trigger
- 2Extract and normalise the core fields
- 3Profile the role with the AI Agent
- 4Connect the OpenAI Chat Model
- 5Parse the AI's JSON with a Code node
- 6Branch executive hires with Is Executive?
- 7Alert HR on executive hires
- 8Send the new hire's welcome email
- 9Notify the manager
- 10Raise the IT setup request
- 11Log everything to Google Sheets
- 12Test end to end, then activate
- 13Submit a standard-priority test hire
- 14Submit a test hire likely to be classified as executive
- 15Force the AI Agent's response to be malformed
If something goes wrong
Everything ready?
Start walkthrough